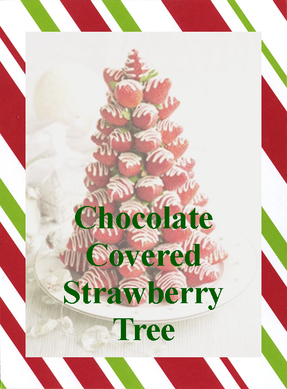
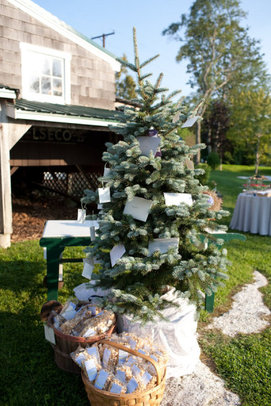
This time of year you can find so many delicious holiday treats that are, of course, so hard to resist. In keeping with the tree theme this week I found this amazing chocolate covered strawberry tree that can be a wonderful treat to have out at a holiday party and can serve as a wonderful table centerpiece. Even though the holidays are filled with tons of sweets and you may want to pass up on one of these chocolate covered goodies just remember that at least this treat can provide you with a serving of fruit!

To make this delicious chocolate covered tree you will need:
     - a Styrofoam Cone
     - Box of Toothpicks (make sure they are sturdy enough to hold up a strawberry!)
     - Strawberries
     - Candy Chocolate
     - Parchment or Wax Paper

Step 1: Wash the strawberries and let them dry.

Step 2: While the berries are drying start melting your chocolate in the microwave according to the instructions on the bag or by using a crockpot or double broiler. *tip: If using multiple colors to decorate your strawberries just melt one at a time so none get over cooked.

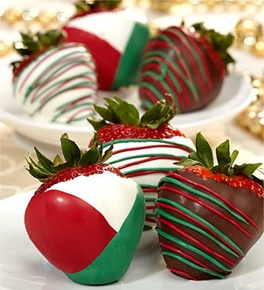
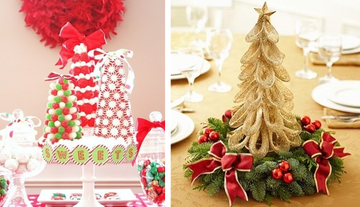
Step 3: Once the strawberries are fully dried its time to decorate! Dip and decorate your berries with the chocolate then let them dry on the parchment paper. Need some decorating inspiration? Here are some great holiday colored berries you can model yours after.

Step 4: When the chocolate has dried it is time to create your tree. Starting at the bottom of your Styrofoam cone take a strawberry and connect it with the toothpick. About half of your tooth pick will be in the strawberry and the other half in the tree. Continue adding strawberries, one next to the other, in circular rows until you reach the top.

Step 5: Find a pretty cake stand to put your beautifully decorated strawberry tree on for all your guests to see and then enjoy!

If you have any leftover strawberries you can enjoy the extra treat! Only 18 more days until Christmas! What are you planning on making in the kitchen this holiday season? Happy Holidays!

xoxo
Megan


You might also like…
 
It’s that time of the year for tree decorating. So whip up some yummy treats, create a festive playlist, pull down those boxes of ornaments, and invite some friends over for a fun holiday tree trimming party. To help in your planning here is what you will need to do!

A tree trimming party doesn’t just have to be about decorating your tree. You can also make it a fun cocktail hour with all your friends. Put out some festive holiday snacks, like these peanut butter reindeer cookies from Bakergirl, and create a holiday themed cocktail or two for all your guests to enjoy, like this Grinch Punch.

You can’t have a tree trimming party without some festive holiday music playing in the background. Put together a mix of your favorite holiday tunes and have them played in the background. Make sure to include some familiar favorites for everyone to sing along with! Need some help creating a playlist? Check out some of my favorite holiday songs!

And if you and your friends are a crafty bunch this could be a great time for each guest to make an ornament to take home to put on their own tree. Check out the ornaments below that I have made for my own tree. Get Decorating!!

The possibilities are endless when it comes to planning a holiday party. You better hurry though! There are only 19 more days until Christmas! Have you finished decorating yet? Happy Holidays!

xoxo
Megan


You might also like…
 
Christmas time is getting nearer and for those planning a wedding during the holiday season I have some great ideas for you today. The Christmas (or holiday) tree can be a great addition to your wedding décor. You can now buy trees in a multitude of colors and sizes so any color palette you choose can coordinate accordingly. Here are some great ways that you can incorporate the Christmas tree into your wedding.

Place Card Holder 

Have a tree at the entrance to the reception site with the place cards hung like ornaments all over the tree. Photo from Style Me Pretty.
Gift Table
Have a tree at the gift table for all the wedding presents to go under. You can also wrap an empty box with a slot in the top for any cards. The gift table will look just like a tree on Christmas morning!
Centerpiece 
From using real trees to creating your own, the tree can serve as a great table or buffet centerpiece during the wedding. You could even put little presents under the tree for each guest at the table to take with them. As an added bonus you can gift the trees to those that helped you prepare for the wedding.
Favors 
For those that want to share with their guests the gift of the green thumb giving out little tree saplings is a great idea. All your guests can take their sapling home, plant them and watch the tree grow along with your marriage. Image from Nancy Gould Photography.
What a festive way to add some holiday cheer to your wedding. Only 19 days left until Christmas! How would you incorporate a tree into your decor? Happy Holidays!!

xoxo
Megan


You might also like…
 
This past weekend was filled with holiday decorating both at my apartment and at my parents. Friday I was in Richmond to attend the Richmond Bizarre Bazaar Christmas Show and got to do a little shopping. Being as this is a Christmas show I also found some great decorating and gift ideas. These ornaments hung from the ceiling created a magical holiday atmosphere! 
After the shop I spent the rest of the weekend finishing up my Christmas shopping and helping decorate for Christmas. All the lights have been added to the outside of my parent’s house and the living room floor was covered in bins of Christmas joy. Just be careful that you don't get blinded by all the tacky lights that are outside!
I also got a little crafty this past weekend and finished decorating my apartment’s tree by making the tree topper. I think the bow came out pretty good considering it was the first time I have made one.
I can’t wait for the holidays to get here. There is only 21 days left until Christmas! Are you all ready for the holidays? Happy Holidays!!

xoxo
Megan


You might also like…
 
Growing up in my house during the holidays always included a lot of cooking, baking and holiday treat making. One holiday treat item my mom taught me to make was holiday peppermint bark. This was something that was easy to make and all my friends loved getting a bag of it during the holidays. Last year I was looking through the December Martha Stewart magazine and saw that there was an article on the bark that I have grown up making. However, this article didn’t just have the traditional peppermint bark that I was used to making. It also had so many new varieties that sounded amazing like s’mores, cookies-n-cream, trail mix and so many more! They were all delicious!!

So for today’s holiday foodie post I have a few of my favorite bark recipes for you to try at home. To make holiday bark you need baking chocolate, a baking sheet, a glass mixing bowl and your favorite bark toppings.

Step 1: Melt the chocolate in a mixing bowl in 45-60 second increment in the microwave, stirring in between, until melted.   –or-    Melt the chocolate in a double broiler on the stove.

Step 2: Once melted, pour the chocolate onto the baking pan, smoothing the chocolate out to create an even coat over the entire pan.

Step 3: While the chocolate is still warm, sprinkle your bark toppings on top of the chocolate. Tap the pan onto the counter a few times to set the toppings into the chocolate.

Step 4: Put the pan into the freezer for the bark to harden.

Step 5: Once hardened, take the bark out and break into pieces. Enjoy!

Some of my favorite bark combinations are:
     - White Chocolate with Red and Green Peppermint
     - Milk Chocolate with Graham Crackers and Mini Marshmallows
     - Milk Chocolate with Oreo Crumbles

Holiday bark candy is always a hit for any type of gathering. Give some as gifts or put some out at your holiday party. Which one are you going to try? Have a wonderful weekend!!

xoxo
Megan


You might also like…
 
Every year I attend at least one Christmas or holiday party that has a gift exchange. If you are hosting a holiday party this is a great way to get all your guests involved and will guarantee to provide some laughs. You will see some of the most random gifts appear at a gift. Here are 3 of my favorite gift exchange games you can choose from.

1. Left-Right Game. This one is a classic for any gift exchange as everyone gets to listen to a fun story while passing the gifts around in a circle. You will gets some laughs from the story as well as trying to keep up with all the “rights” and “lefts” that you will hear. You can make up your own story or use the classic Night Before Christmas story that has had a little twist!

2. Secret Santa. You can’t forget the classic gift exchange of Secret Santa. Get everyone together before your party and have each guest draw a name to see who they will be shopping for. If you can’t get everyone together, as the host, you can either assign each guest another guest’s name or you can use an online site to do it for you. A great one to use is SecretSanta.com. They let you send out all your invitations through the site, collects RSVP’s and will randomly generate and send out everyone’s Secret Santa.

3. White Elephant. This game has a few more rules to it than the others. To play ask all your guests to bring a present to put in the gift pile. Once you have everyone together you have each guest draw a number which will give them the order of the gift choosing. The person with #1 starts by selecting a gift. Next is #2’s turn. They can either take #1’s gift or choose their own from the gift pile. If #2 takes #1’s gift then #1 chooses a new gift from the pile. Next is #3. They can choose to take either gift that is already unwrapped or a new one from the pile. If #3 steals the gift from #1 or #2 then that person can steal the remaining gift or open a new one. During each round (each number starts a new round) each gift can only be stolen once. However, that gift can be stolen again during the next round. A round ends when a gift has been opened from the present pile. This continues on until the last gift has been opened from the pile.

If you choose to one of the group games make sure all your guests bring wrapped and unmarked presents. It is also important when organizing a gift exchange to let all your guests know what the spending range is. A pretty standard gift exchange range is between $10-15.

No matter what type of gift exchange you choose to do every guest will have a blast participating. Which gift exchange game is your favorite? Happy Holidays!!

xoxo
Megan


You might also like…
 
Happy Black Friday to you all as we are now fully into holiday mode! I have already broken out the Christmas music and the decorations will be following shortly!!

To kick off the holiday spirit I have a great craft that you can make for all your holiday gifts and parties that are to come. These reindeer drink decorations are easy to do and are easy to customize. So go pick out your favorite bottled beverage and start crafting!

To make these you will need:
    - your favorite bottled beverage (wine bottles, beer, water, etc.)
    - brown pipe cleaners
    - red pom poms
    - googly eyes
    - glue gun or craft glue

** Before you start make sure your beverage bottle is at room temperature or else the glue will have a hard time sticking. 

Step 1: To make the antlers take a pipe cleaner and cut it into fourths. Take two of the cut pieces and twist one onto each end of a new pipe cleaner to make the antlers. Then twist your antlers onto the top neck of the bottle.

Step 2: Next glue a set of googly eyes and a pom pom onto the bottle to make your reindeer's face. Once the glue has dried your bottles are all ready for the holidays! 

I made these last year for my friends for their Christmas gifts. They fully appreciated a six pack of reindeer beer. If you are going to a holiday party you can decorate a bottle of wine to give as a gift to the hostess. Or if you just want some festive drinks for the holiday you can save these for yourself. Get ready to play some reindeer games with these holiday drinks.

xoxo
Megan