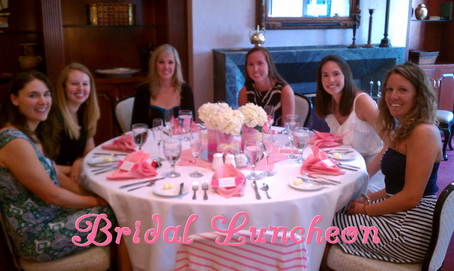
On Monday I shared some pictures from last weekend's wedding festivities. However, I saved sharing one of the events, the bridal luncheon, for today. As a gift to the bride, my mother offered to host a bridal luncheon the Friday before the wedding. When her and my sister went to go find invitations for the event she came across the most adorable plates and napkins. We decided that we would take inspiration from those two items to create the decor for the event.
For this luncheon I coordinated with the venue catering director of room setup and menu, created the place cards, centerpieces, and dessert display. Each of the the DIY crafts that I made for this event are so easy to do and can be altered to fit any color options or event theme. The colors that I used for this Pretty in Pink luncheon were pink, blue and yellow.
For this luncheon I coordinated with the venue catering director of room setup and menu, created the place cards, centerpieces, and dessert display. Each of the the DIY crafts that I made for this event are so easy to do and can be altered to fit any color options or event theme. The colors that I used for this Pretty in Pink luncheon were pink, blue and yellow.
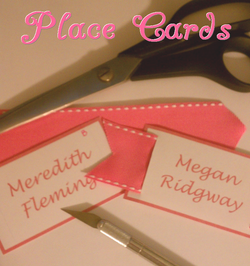
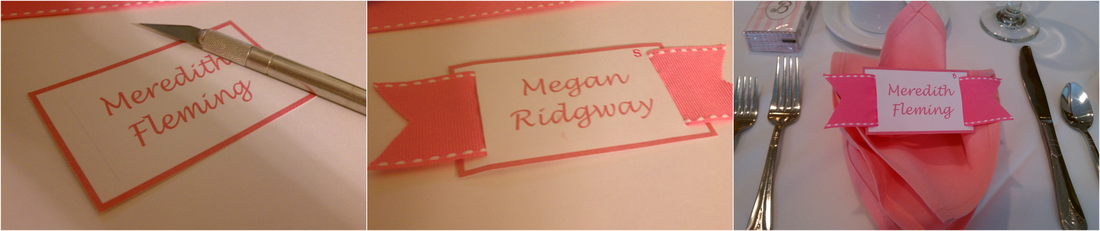
I found the idea for these place cards from good old Martha Stewart. I altered her instructions a little bit and created these for the event. With our theme I chose to create all the place cards with pink ribbon and coordinated the color of cards with their lunch choice.
To make these you will need card stock, scissors, an x-acto knife, and ribbon. First I created the place cards on the computer, then printed them onto the card stock. In the design of them I included a very faded line that I would be able to follow to cut the slit that the ribbon would go through. After they were printed I used the scissors to cut out each place card. I then used the x-acto knife to cut two openings for the ribbon. Last, I threaded the ribbon through and cut the edges.
To make these you will need card stock, scissors, an x-acto knife, and ribbon. First I created the place cards on the computer, then printed them onto the card stock. In the design of them I included a very faded line that I would be able to follow to cut the slit that the ribbon would go through. After they were printed I used the scissors to cut out each place card. I then used the x-acto knife to cut two openings for the ribbon. Last, I threaded the ribbon through and cut the edges.
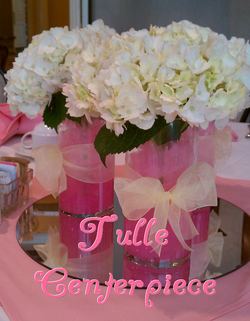
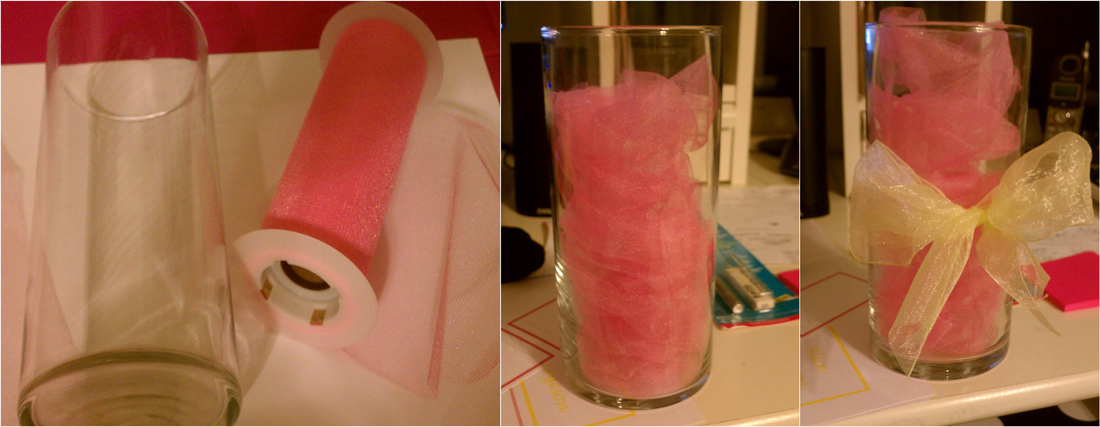
The second DIY craft that I put together were these tulle centerpieces. The flowers that were going to be used in the wedding were hydrangeas, and became the flower of choice for the luncheon. When it comes to picking out your flowers you don't have to spend a lot on the arrangement. Selecting flowers that have large blooms, like these, allow you to use just one or two stems per arrangement.
To create these arrangements you will need a roll of tulle, a roll of ribbon, scissors, vases, flowers and water. To start I the tulle into approximately 8 foot pieces. Next I rolled the tulle up so that it would fit inside the vase. I then took a piece of ribbon and tied a small bow around the middle of the vase. Once I was at the venue I added water to about the halfway point (water doesn't damage the tulle and actually helps it stick to the sides of the vase) and then added one stem of hydrangeas to each vase. And tada! You now have an amazing centerpiece!
To create these arrangements you will need a roll of tulle, a roll of ribbon, scissors, vases, flowers and water. To start I the tulle into approximately 8 foot pieces. Next I rolled the tulle up so that it would fit inside the vase. I then took a piece of ribbon and tied a small bow around the middle of the vase. Once I was at the venue I added water to about the halfway point (water doesn't damage the tulle and actually helps it stick to the sides of the vase) and then added one stem of hydrangeas to each vase. And tada! You now have an amazing centerpiece!
The last item that I made was the display stand for the cupcakes we custom ordered from Pearl's Cupcake Shoppe in Richmond. To start I already had the wire cupcake stand that I bought a few years ago on sale at Target. Once you have a stand all you need to do is to buy sheets of 12x12 inch scrapbook paper. I picked out adorable pink and white stripped sheets for this display to keep with the Pretty in Pink theme. Next I cut out a circle that would fit on the inside of each level. To get it to fit I then found the middle and cut a straight line from the edge to the center point. I also made small cuts perpendicular to the cut from the edge, so that it formed an "x" in the middle. To put it all together I folded up each wing of the center "x," slid the paper onto each level and added the cupcakes to the display stand.
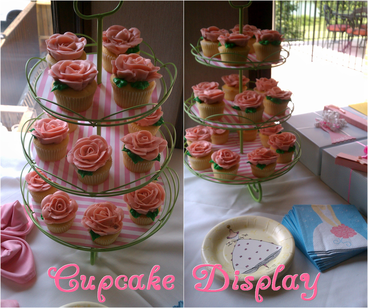
You can see the plates and napkins, that inspired the event theme, in the bottom right of the cupcake display picture. Each of these crafts don't cost much, can be easily changed for your next event and took no time at all to make. Overall everyone loved the luncheon and it was a great start to the weekend of wedding festivities. Did you have a bridal luncheon before your wedding?
xoxo
Megan
xoxo
Megan


 RSS Feed