I cannot wait for all the summertime parties and events to get started! No matter if it is a pool party or a night under the stars in your own backyard you can’t go wrong with these party essentials. As always the amazing Martha Stewart knows what to do when it comes to party crafting. I have four DIY crafting ideas that will prepare you for any summertime get together. So grab your crafting essentials and get ready to craft your way to a summer of fun!
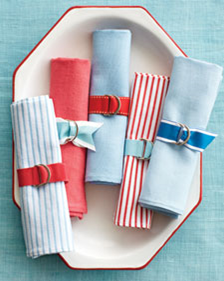
Preppy Napkin Rings
Materials:
Stitched grosgrain
Imported Chromspun grosgrain
Nickel D rings, 1 inch wide
Fabric glue
Instructions:
Step 1: Cut 9-inch lengths of grosgrain ribbon or twill tape. Notch 1 end, or cut it at an angle. Loop the other end through 2 D rings, wrapping ribbon around the rings' straight edges, and glue it to itself with fabric glue.
Step 2: Center a rolled napkin on the ribbon; thread the ribbon's free end through the rings as you would a belt, and pull it snug.
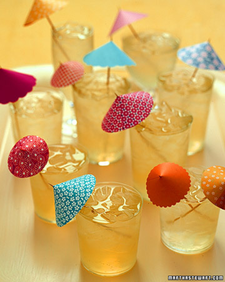
Drink Umbrellas
Materials:
Paper
Pinking shears or scallop scissors
Glue stick or double-sided tape
Craft glue
Wooden skewer
Scissors
Instructions:
Step 1: Cut paper with pinking shears or scallop scissors for a decorative edge.
Step 2: From each circle, remove a pie-slice shape measuring about 1/8 of the circumference. Fashion into a cone, slightly overlapping straight ends; use a glue stick or double-sided tape to secure.
Step 3: Dab white craft glue inside nose of cone, and pierce tip with a wooden skewer (snip skewer for a custom fit); allow to dry.
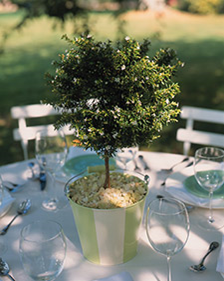
Metal Bucket Centerpiece
Materials:
Metal beach buckets
Sandpaper
Primer
Water-based enamel paint
Masking tape or stencils
Pencil
Instructions:
Step 1: Sand and prime each bucket, then coat with water-based enamel; let dry overnight.
Step 2: Once dried decorate with stripes, dots or other fun summertime pattern.
Step 3: Fill the buckets with plants, souvenirs, shells or other summertime goody to complete your centerpiece.
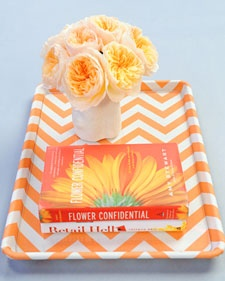
Decorative Tray
Materials:
1 yard decorative fabric
Aluminum rimmed baking sheet
Spray adhesive
Scissors
Fabric glue
Synthetic felt
1/4-inch-thick acrylic sheet cut to fit inside of tray
Instructions:
Step 1: Cut fabric large enough to cover the front and wrap around the back of the baking tray. Cover the front of the tray with spray adhesive.
Step 2: Place fabric on tray so pattern is aligned, leaving enough room to wrap fabric around all sides to the back. Smooth fabric onto tray, pressing out any bubbles.
Step 3: Pull any extra material into corner and push around the edge. Turn tray over. Cover the back of the tray with spray adhesive.
Step 4: Press the fabric over two edges of the tray first, then fold in on each remaining side, as if wrapping a gift. Trim any excess fabric with scissors. Use fabric glue to secure, if needed.
Step 5: Cut a piece of felt to fit the back of the tray and conceal fabric edges. Smooth felt on the back the tray.
Step 6: Place acrylic sheet in center of tray.
Now you are ready for any celebration that may come your way this summer! Do you have any other great DIY ideas that would be great for a summer party? Share your ideas below!
xoxo
Megan
You might also like…
xoxo
Megan
You might also like…


 RSS Feed